Contents
CAJAL3D Demo Script
Set xyz starting point. Since anyone can use this script you may want to "move" to a different region to run.
xstart = 3000;
ystart = 6000;
zstart = 400;
Create OCP Interface and set tokens
% Create an OCP Object.  This is the main class used for talking with OCP
% services. If you want to create an OCP object that will use the
% distributed semaphore (assuming you've set it up) use OCP('semaphore')
% instead.
oo = OCP();

% Set the server location.  This is the default server and most likely the
% one you should be using.
oo.setServerLocation('http://openconnecto.me/');

% Set the image token.  This is the database for image data reading.
oo.setImageToken('kasthuri11cc');

% Set the image token.  This is the database for image data reading. You
% can also read this from a file using setAnnoTokenFile. Also update
% propagate status to make the annotation project writeable.
% Note: We do not propagate in the demo script.
oo.setAnnoToken('cajal_demo');
oo.setAnnoChannel('anno');
oo.makeAnnoWritable();

% Information about the databases are accessible
oo.annoInfo.DATASET
oo.annoInfo.DATASET.IMAGE_SIZE(1)

% Set the default resolution.  This is the resolution at which operations
% should occur unless otherwise specified.
oo.setDefaultResolution(1);

% There are other options to further tweak the OCP object.
% oo.setBatchSize - This sets the maximum number of objects the API will
% group into a single batch write.  You shouldn't have to change this.
% oo.setMaxAnnoSize - This is the maximum size an annotation can be before
% the API automatically chunks it up into multiple writes. You shouldn't
% have to touch this.
% oo.setErrorPageLocation - this is where OCP errors will be written.  The
% server generates an html response that can be viewed for debugging.
ans =

    CUBE_DIMENSION: [8x1 containers.Map]
        IMAGE_SIZE: [8x1 containers.Map]
              NAME: {'kasthuri11cc'}
            OFFSET: [8x1 containers.Map]
       RESOLUTIONS: [0 1 2 3 4 5 6 7]
         TIMERANGE: [0 0]
          VOXELRES: [8x1 containers.Map]


ans =

       10752       13312        1850
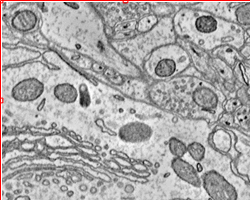
Get Some Image Data
The OCPQuery object is the basis for building queries for the database. The constructors accept multiple options so check out the code.
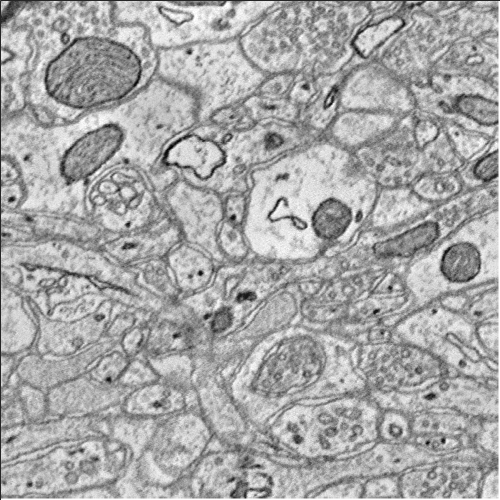
% Build query to cutout IMAGE data.
q = OCPQuery(eOCPQueryType.imageDense);

% The validate method can be used to check if the query has any errors
[pf, msg] = q.validate()

% setCutoutArgs sets all the required fields for a cutout query.
q.setCutoutArgs([xstart xstart+500],...
                [ystart ystart+500],...
                [zstart zstart+5],...
                1);

% Query is now valid
[pf, msg] = q.validate()

% Download the data into a RAMONVolume. The RAMONVolume stores the image
% data in the .data property.  There are other useful bits of information,
% specifically the xyzOffset value which indicates where the data came
% from.
cutout = oo.query(q);
cutout

% The image method has been overloaded to launch the API's simple data
% viewer.  '?' prints the shortcuts
image(cutout);
pf =

     0


msg =

[E] X Range is required for dense cutouts
[E] Y Range is required for dense cutouts
[E] Z Range is required for dense cutouts
[W] Resolution is empty.  Default resolution will be used at runtime.


pf =

     1


msg =

     ''


cutout =

  500x500x5 RAMONVolume array with properties:

            xyzOffset: [3000 6000 400]
           resolution: 1
                 name: 'image'
    sliceDisplayIndex: 1
           dataFormat: [1x1 eRAMONDataFormat]
                 data: [500x500x5 uint8]
                   id: []
              channel: []
           confidence: 1
      dynamicMetadata: [0x1 containers.Map]
               status: [1x1 eRAMONAnnoStatus]
               author: 'unspecified'
             dataType: [1x1 eRAMONChannelDataType]
          channelType: [1x1 eRAMONChannelType]
Create a Synapse
Create some 'dummy' labels
d = zeros(200,200,5);
d(30:170,30:170,:) = 1;

% Create an empty RAMONSynapse object
s1 = RAMONSynapse()

% Set the objects properties as desired.
s1.setCutout(uint32(d));
s1.setXyzOffset([xstart ystart zstart]);
s1.setResolution(1);

s1.setSynapseType(eRAMONSynapseType.excitatory);
s1.setSeeds([2 4 6 3]);
s1.setConfidence(.8);
s1 =

  0x0 RAMONSynapse array with properties:

          synapseType: [1x1 eRAMONSynapseType]
               weight: []
             segments: [0x1 containers.Map]
                seeds: []
            xyzOffset: []
           resolution: []
                 name: 'Volume1'
    sliceDisplayIndex: 1
           dataFormat: [1x1 eRAMONDataFormat]
                 data: []
                   id: []
              channel: []
           confidence: 1
      dynamicMetadata: [0x1 containers.Map]
               status: [1x1 eRAMONAnnoStatus]
               author: 'unspecified'
             dataType: []
          channelType: []
Upload a Synapse
%Simply passing the RAMON object (or any RAMON object really...) will upload
%the data and create an annotation.  The database will assign an ID as long
%as the ID was empty in the RAMON object.
id1 = oo.createAnnotation(s1);
Download a Synapse
The server can't get objects that don't exist THIS LINE SHOULD THROW AN EXCEPTION AS AN EXAMPLE
%sbad = oo.query(OCPQuery(eOCPQueryType.RAMONDense,4565564531));

% Download the synapse we just uploaded. s1 and s2 should now contain the
% same data, but s2 has been spatially aligned to the backend storage cuboids and has
% been assigned an ID.
s2 = oo.query(OCPQuery(eOCPQueryType.RAMONDense,id1));
Update a Synapse
You can directly update metadata fields
f = OCPFields();
oo.getField(id1,f.synapse.author)
oo.setField(id1,f.synapse.author,'demo_test');
oo.getField(id1,f.synapse.author)

% You can also update the object locally and then push the changes.  if
% you're changing the annotation data this is how it is done as well.
oo.getField(id1,f.synapse.weight)
s2.setWeight(.5);
id1 = oo.updateAnnotation(s2);
oo.getField(id1,f.synapse.weight)
ans =

unspecified


ans =

demo_test


ans =

     0


ans =

    0.5000
Query for Synapses
You can query the database for IDs that match some list of predicates. This can also be done spatially!
q = OCPQuery(eOCPQueryType.RAMONIdList);
q.addIdListPredicate(eOCPPredicate.type,eRAMONAnnoType.synapse);

idList = oo.query(q) %#ok<*NASGU,*NOPTS>
idList =

           1           3          14
Delete a Synapse
Delete and annotation by its ID
oo.deleteAnnotation(id1)

idList = oo.query(q)
ans =

Success


idList =

           1           3
Re-Upload the Synapse
% Create some 'dummy' labels
d = zeros(200,200,5);
d(30:170,30:170,:) = 1;

% Create an RAMONSynapse object with a single call.
s3 = RAMONSynapse(d,eRAMONDataFormat.dense,[xstart+450 ystart+540 zstart+65],1);
id3 = oo.createAnnotation(s3);
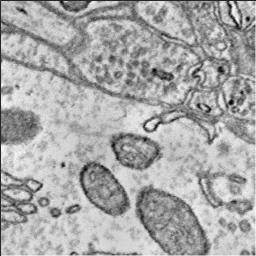
Download a server side rendered overlay image (2D only)
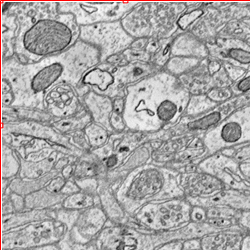
q = OCPQuery(eOCPQueryType.overlaySlice);
q.setSliceArgs(eOCPSlicePlane.xy,...
    [s1.xyzOffset(1) - 250, s1.xyzOffset(1) + 250],...
    [s1.xyzOffset(2) - 250, s1.xyzOffset(2) + 250],...
    s1.xyzOffset(3) + 2,...
    1)

slice = oo.query(q);
figure;
imshow(slice);

% You can set the alpha too.
q.setOverlayAlpha(.7);
slice = oo.query(q);
figure;
imshow(slice);


% You can set the alpha too.
q.setOverlayAlpha(.3);
slice = oo.query(q);
figure;
imshow(slice);
ans =

  OCPQuery with properties:

                type: [1x1 eOCPQueryType]
                  id: []
          resolution: 1
              xRange: []
              yRange: []
              zRange: []
          slicePlane: [1x1 eOCPSlicePlane]
              aRange: [2750 3250]
              bRange: [5750 6250]
              cIndex: 402
        overlayAlpha: []
    idListPredicates: [0x1 containers.Map]
         idListLimit: []
            xyzCoord: []
           filterIds: []
            channels: []


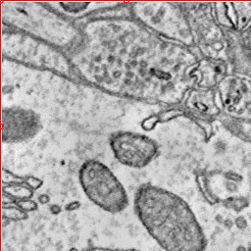
Download Image and Anno Cutouts
Finally lets cutout both an image and annotation volume around the annotation we created and view them together using the basic viewer.
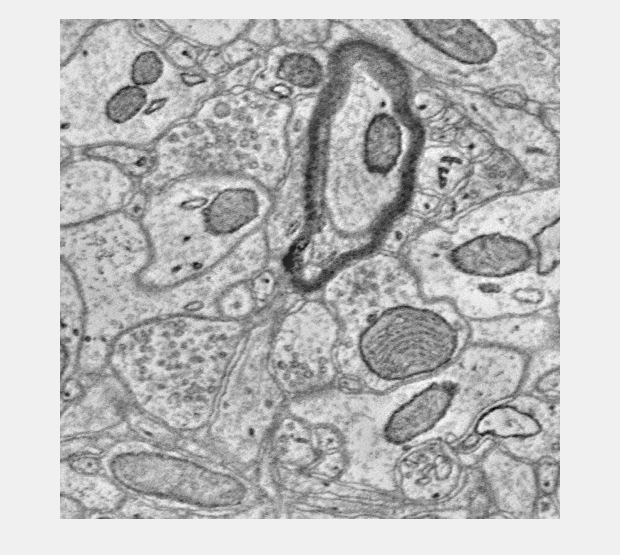
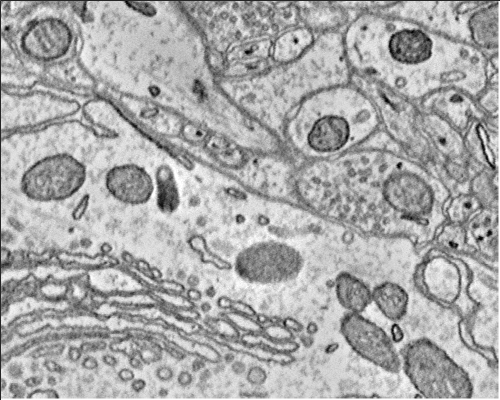
% You can do it the hard manual way.
q = OCPQuery(eOCPQueryType.annoDense);
q.setCutoutArgs([s3.xyzOffset(1) - 250 s3.xyzOffset(1) + 250],...
                [s3.xyzOffset(2) - 150 s3.xyzOffset(2) + 250],...
                [s3.xyzOffset(3) - 3 s3.xyzOffset(3) + 3],...
                1);
cutoutAnno = oo.query(q);

q = OCPQuery(eOCPQueryType.imageDense);
q.setCutoutArgs([s3.xyzOffset(1) - 250 s3.xyzOffset(1) + 250],...
                [s3.xyzOffset(2) - 150 s3.xyzOffset(2) + 250],...
                [s3.xyzOffset(3) - 3 s3.xyzOffset(3) + 3],...
                1);
cutoutImage = oo.query(q);

h = image(cutoutImage);

% Press the 'a' key to toggle the annotation overlay on and off.
h.associate(cutoutAnno);

% You can also do it the easy automatic way if you are trying to just
% visualize a specific RAMON Object.
q = OCPQuery(eOCPQueryType.RAMONDense,id3)
cutoutAnno = oo.query(q);

q_anno = cutoutAnno.toImageDenseQuery();
cutoutImg = oo.query(q_anno);


h = image(cutoutImg);
h.associate(cutoutAnno);
q =

  OCPQuery with properties:

                type: [1x1 eOCPQueryType]
                  id: 15
          resolution: []
              xRange: []
              yRange: []
              zRange: []
          slicePlane: []
              aRange: []
              bRange: []
              cIndex: []
        overlayAlpha: []
    idListPredicates: [0x1 containers.Map]
         idListLimit: []
            xyzCoord: []
           filterIds: []
            channels: []
More...
This example script provides some initial code to get you started, but there is much more to the API. The unit tests more comprehensively describe the full functionality.